Model Metadata
Every backpack has a special JSON metadata file that is used to define properties about that backpack. This includes display properties which control how the model appears on the shelf and in the GUI. It optionally gives you the ability to completely take control of how the backpack is drawn, which is used for creating advanced models with animations.
Model Meta Directory
Just like other files used to create custom backpacks, model meta files need to be placed into a sepcific directory for Backpacked to detect them. In your assets directory, create the directory structure: assets/<namespace>/backpacked/.
If you downloaded the Base Resource & Data Pack from the Assets page. The directory should have already be created.
If you are developing a mod or integrating into an existing mod, create the structure from your src/main/resources directory. If you are working in a multiloader project, make sure it is created in your common module.
For clarification, the directory is named backpacked and not backpack. This is intentional, and not a typo.
Basic Metadata File
In the model meta directory, as created in the previous section, create a new JSON file with name of your backpack. The name must be the same as when you registered the backpack, e.g. <your_backpack_name>.json.
Inside the newly created file, copy and paste in the following contents. The will act as a template for your backpack.
{
    "shelf_offset": [0, 0, 0],
    "display": {
        ...
    }
}
Property: shelf_offset
This is an array that contains local XYZ offset in pixel space to fix the positioning of your backpack model on the shelf. By default, the ground plane in Blockbench when using the stardard template is the position the backpack sits on. However if your backpack model exceeds the ground place or is not positioned to your liking, it can be adjust by changing the values.
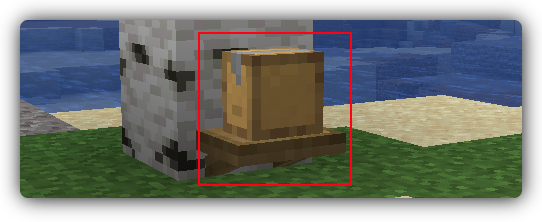
How to Configure
In game, place down a Shelf. Get a backpack and update the cosmetic to your model. Place the backpack onto the Shelf by right clicking while sneaking. In your model meta JSON file, locate the shelf_offset array. The array is represented as [X, Y, Z] and each unit is in pixel space, e.g. [1, 0, 0] moves the backpack model one pixel to the right relative to the facing direction of the shelf. Adjust the values, save the file, then press F3 + T in-game to reload your resources. Check the model is sitting on the shelf without clipping into the shelf model and is centered. Repeat adjustments to the array and reload until you are satisfied.
If you are developing or integrating into a mod, you will need to rebuild your project to update the resources, then you can press F3 + T in-game to reload your resources.
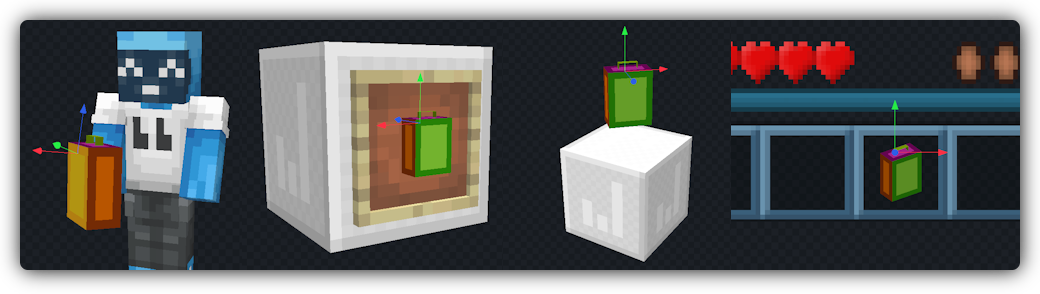
Property: display
This is an object that holds the display transforms for the model. This is used when rendering the backpack in the customisation menu and when rendering the backpack as an item. Luckily this is very easy to configure since it is exactly the same as configuring the display transforms for an item.
![]()
How to Configure
Open Blockbench and load the project for your backpack model. Disable the visibility of the Straps and Player Model groups, so only the Backpack group is visible. Navigate to the Display tab at the top right, and you will see a Slot section in the leftside bar. This section contains different scenarios where the backpack may be drawn. If you're using the backpack template, this will come preconfigured with default settings. Go through all the different slot options (Thirdperson Right, Ground, GUI, etc) and tweak them as you need.
It is not necessary to configure the Thridperson Left and Firstperson Left as these slots will be automatically inferred by the Thridperson Right and Firstperson Right slots. To ensure they are not configured, press the reset button for each transform (Rotation, Translation, and Scale) while selected on Thridperson Left slot, and repeat for the Firstperson Left slot. The backpack template will not have these slots configured by default.
Once you've configured all your display transforms, export your model as a Block/Item Model to a temporary file (this can be deleted afterwards). Open the newly exported file (which should be a JSON file), and locate the display object. Copy the entire display object and replace the display object in your backpacks meta file.
Before replacing:
{
    "shelf_offset": [0, 0, 0],
    "display": {
        ...
    }
}
After replacing (your values may be different):
{
    "shelf_offset": [0, 0, 0],
    "display": {
        "thirdperson_righthand": {
            "rotation": [75, -45, 0],
            "translation": [0.75, 5.75, 3.25]
        },
        "firstperson_righthand": {
            "rotation": [0, -45, 0],
            "translation": [-0.5, 4.5, 0.5],
            "scale": [0.5, 0.5, 0.5]
        },
        "ground": {
            "translation": [0, 4.75, -2]
        },
        "gui": {
            "rotation": [30, 35, 0],
            "translation": [-1.25, 4.25, 0],
            "scale": [1.1, 1.1, 1.1]
        },
        "head": {
            "rotation": [0, -180, 0],
            "translation": [0, 14.5, 2.5]
        },
        "fixed": {
            "rotation": [0, -180, 0],
            "translation": [0, 3.5, 1]
        },
        "on_shelf": {
            "translation": [0, 1.25, -4]
        }
    }
}
Please note that on_shelf property is only applicable for addons in Minecraft 1.21.9 or above; however it can be safely left in the file even if on a lower version.
Advanced Rendering
This is a very advanced topic. Unless you have at least high level understanding of operations like, push/pop matrix, translate, rotate, and scale, it will be difficult to understand the guide.
Model metadata also supports a property called renderer. In the renderer object, a type can be set to determine the rendering controller of the backpack. If the renderer property is absent, then the backpack will be rendered using the default renderering controller (backpacked:default).
Addons can also perform advanced rendering, using the backpacked:advanced controller. This enable the ability to create animations and contextual rendering for your backpack. This section has been moved to it's own dedicated guide.
{
    "renderer": {
        "type": "backpacked:advanced",
        "functions": [
            ...
        ]
    }
}
Next Step
You may have noticed that the name of the backpack in the GUI is using translation key. It's now time to add translations!